(302) 262 8484
The Windows Secret Sandbox Feature You Need to Start Using Today

Have you ever downloaded a suspicious app or clicked a sketchy link and immediately regretted it? We have all been there, hovering our cursors over an installer file, wondering if it is about to wreck our operating system. Fortunately, there is a built-in tool that lets you test programs without risking your PC. The Windows secret sandbox feature is a lifesaver for anyone who loves experimenting with new software but hates the threat of malware.
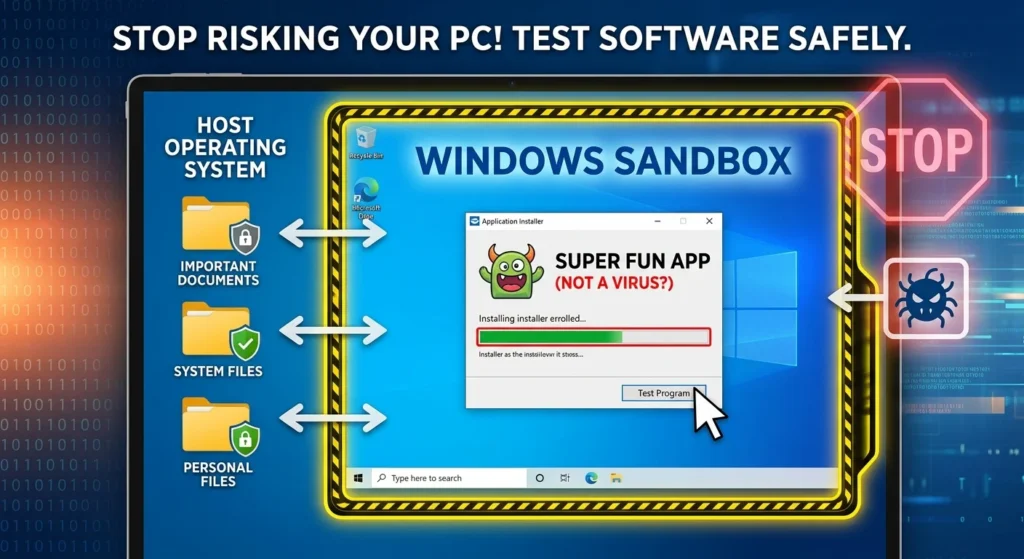
This tool, officially known as Windows Sandbox, acts as a temporary, isolated playground for your computer. It runs a completely separate version of Windows inside a secure window on your desktop. Here is the best part: the second you close it, everything you did inside vanishes forever.
What is the Windows Secret Sandbox Feature?
Think of Windows Sandbox as a disposable digital quarantine room. It uses hardware-based virtualization to run a lightweight, clean version of Windows that is entirely cut off from your main operating system. Any program you run inside this environment cannot touch your actual files, registry, or system settings.
So what does that mean for you? You can run shady installers, test experimental software, or open suspicious email attachments without worrying about catching a virus. It is an incredibly fast, secure, and free way to protect your machine.
Every time you launch this tool, you get a pristine, brand-new installation of Windows. There is no need to manually set up a bulky virtual machine or pay for expensive third-party sandbox software. It is already sitting right there on your hard drive, waiting to be turned on.
Why Use Windows Sandbox Instead of a Traditional Virtual Machine?
If you have ever set up a traditional virtual machine, you know it can be a massive headache. You have to download massive disk images, allocate gigabytes of RAM, and manage licensing. Windows Sandbox skips all of that nonsense.
Here is why it is vastly superior for quick tasks:
- It is incredibly fast: It boots up in just a few seconds because it shares the host system’s resources dynamically.
- No licensing required: Since it is part of your existing operating system, you do not need a separate product key.
- Zero residue left behind: Once you click the close button, every single file, registry change, and downloaded app is permanently deleted.
- Highly secure: It relies on Microsoft’s hypervisor to keep the sandbox completely isolated from your host kernel.
How to Enable the Windows Secret Sandbox Feature
Before you can start playing in the sandbox, you need to make sure your system meets the requirements. Unfortunately, this feature is not available on Windows Home editions. You will need Windows 10 or Windows 11 Pro, Enterprise, or Education to use it.
Your computer also needs to have hardware virtualization enabled in the BIOS, which is usually turned on by default on most modern PCs. You will also want at least 4 GB of RAM, though 8 GB is highly recommended for smooth performance.
If your system checks those boxes, enabling the feature is incredibly simple. Just follow these steps:
- Open the Start menu, type ‘Turn Windows features on or off’, and press Enter.
- Scroll down the list until you find ‘Windows Sandbox’.
- Check the box next to it and click ‘OK’.
- Windows will search for the necessary files and prompt you to restart your computer.
- Click ‘Restart Now’ to complete the installation.
Now, this is where it matters. If you prefer using command-line tools, you can easily enable it using PowerShell. Just open PowerShell as an administrator and run the command: Enable-WindowsOptionalFeature -FeatureName 'Containers-DisposableClientVM' -All -Online. It does the exact same thing but saves you a few clicks.
How to Use Windows Sandbox Safely
Once your computer restarts, you are ready to go. Open your Start menu, search for ‘Windows Sandbox’, and launch it. A window will pop up showing a clean, default Windows desktop.
To test a file, simply copy the installer from your main desktop and paste it directly into the sandbox window. You can then run the installer, configure the app, and test its features. It is that simple.
Remember that the sandbox has internet access by default, so you can also use it to test sketchy websites or suspicious links. Just keep in mind that while the host is safe, anything inside the sandbox can still talk to your local network if you do not disable networking in the configuration files.
When you are finished testing, simply click the ‘X’ in the top-right corner of the sandbox window. Windows will warn you that all data will be permanently lost. Click ‘OK’, and the sandbox will instantly vanish, leaving your actual PC perfectly clean and untouched.
It is a brilliant, underutilized tool that every Windows user should know about. Stop risking your main operating system with random downloads and start using this built-in safety net today.